//需要添加进 ViewController 的 viewDidLoad 中
navigationController?.navigationBar.setBackgroundImage(UIImage(), for: .default)
navigationController?.navigationBar.shadowImage = UIImage()
要让导览列变透明,只需要设定背景图片与阴影图片为一张空白图片,也就是 UIImage()
王同学的学习簿
//需要添加进 ViewController 的 viewDidLoad 中
navigationController?.navigationBar.setBackgroundImage(UIImage(), for: .default)
navigationController?.navigationBar.shadowImage = UIImage()要让导览列变透明,只需要设定背景图片与阴影图片为一张空白图片,也就是 UIImage()

//以下是 ViewController 的代码
import UIKit
class RestaurantDetailViewController: UIViewController, UITableViewDataSource, UITableViewDelegate {
@IBOutlet var tableView: UITableView!
@IBOutlet var headerView: RestaurantDetailHeaderView!
var restaurant = Restaurant()
// MARK: - View controller life cycle
override func viewDidLoad() {
super.viewDidLoad()
navigationItem.largeTitleDisplayMode = .never
// Configure header view
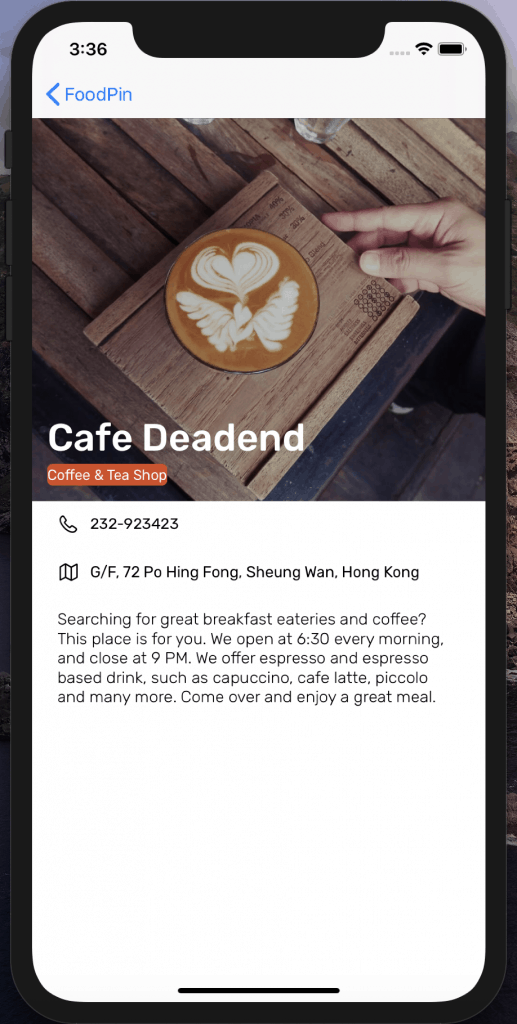
headerView.nameLabel.text = restaurant.name
headerView.typeLabel.text = restaurant.type
headerView.headerImageView.image = UIImage(named: restaurant.image)
headerView.heartImageView.isHidden = (restaurant.isVisited) ? false : true
// Configure the table view
tableView.delegate = self
tableView.dataSource = self
//程序和 cell 视图中的数据关联
//与 Storyboard 来关联,二选一
tableView.separatorStyle = .none
//设置样式为 .none 以移除表格的分界线
}
// MARK: - Table view data source
func numberOfSections(in tableView: UITableView) -> Int {
return 1
//表示表格视图只有一个区块
//缺省为 1,不写不影响运行
}
func tableView(_ tableView: UITableView, numberOfRowsInSection section: Int) -> Int {
return 3
}
//定义 cell 有三个小节
func tableView(_ tableView: UITableView, cellForRowAt indexPath: IndexPath) -> UITableViewCell {
switch indexPath.row {
//用 switch 控制三个小节的渲染,并用 indexPath.row 进行判断
case 0:
let cell = tableView.dequeueReusableCell(withIdentifier: String(describing: RestaurantDetailIconTextCell.self), for: indexPath) as! RestaurantDetailIconTextCell
//调用 RestaurantDetailIconTextCell (第一个小节模板),带描述和图标。用 as!将 cell 向下转型为 RestaurantDetailIconTextCell,以方便调用其方法
cell.iconImageView.image = UIImage(systemName: "phone")?.withTintColor(.black, renderingMode: .alwaysOriginal)
//调用系统内置“电话”图标,并通过 withTintColor 赋予黑色。内置图标默认蓝色
//renderingMode(渲染模式) 设置为 alwaysOriginal (始终绘制原始图像,而不将其视为模板)
cell.shortTextLabel.text = restaurant.phone
cell.selectionStyle = .none
return cell
//返回 cell 数据
case 1:
let cell = tableView.dequeueReusableCell(withIdentifier: String(describing: RestaurantDetailIconTextCell.self), for: indexPath) as! RestaurantDetailIconTextCell
//调用 RestaurantDetailIconTextCell (第一个小节模板),带描述和图标。用 as!将 cell 向下转型为 RestaurantDetailIconTextCell,以方便调用其方法
cell.iconImageView.image = UIImage(systemName: "map")?.withTintColor(.black, renderingMode: .alwaysOriginal)
//调用系统内置“地图”图标,并通过 withTintColor 赋予黑色。内置图标默认蓝色
//renderingMode(渲染模式) 设置为 alwaysOriginal (始终绘制原始图像,而不将其视为模板)
cell.shortTextLabel.text = restaurant.location
cell.selectionStyle = .none
return cell
//返回 cell 数据
case 2:
let cell = tableView.dequeueReusableCell(withIdentifier: String(describing: RestaurantDetailTextCell.self), for: indexPath) as! RestaurantDetailTextCell
//调用 RestaurantDetailTextCell (第二个小节模板),只有描述。用 as!将 cell 向下转型为 RestaurantDetailTextCell,以方便调用其方法
cell.descriptionLabel.text = restaurant.description
cell.selectionStyle = .none
return cell
//返回 cell 数据
default:
fatalError("Failed to instantiate the table view cell for detail view controller")
//在 case 0、1、2 都无法匹配的时候进行报错
}
}
}
在构建 cell 时,可以将 cell 的识别码设置为其自定义类别的名称。目的是可以清楚的指定识别码并取出Cell,如下所示:
let cell = tableView.dequeueReusableCell(withIdentifier: "RestaurantDetailIconTextCell", for: indexPath) as! RestaurantDetailIconTextCell
如果使用 String(describing: RestaurantDetailIconTextCell.self), 则会回传类别的名称(也就是 「RestaurantDetailIconTextCell 」)
let cell = tableView.dequeueReusableCell(withIdentifier: String(describing: RestaurantDetailIconTextCell.self), for: indexPath) as! RestaurantDetailIconTextCell那这两种方法哪种好呢?
用第一段代码,是将 cell 的识别码固定写入。如果将识别码打错,Xcode 编译也不会出现任何错误。只有在运行 App 的时候才会发现出现问题。
使用第二段代码,如果打错了类别的名称(比如打成 RestaurantDetailIconTxtCell.self ),Xcode 会马上提示错误。所以更加推荐使用第二种代码。